The UAE’s creative industry is growing rapidly, with musicians, podcasters, voiceover artists, YouTubers, and content creators building professional recording spaces across Dubai, Abu Dhabi, and other Emirates. However, creating a high-quality recording studio requires much more than microphones and speakers. Proper acoustic design, soundproofing, and room treatment are essential for achieving clean and professional audio.
Whether you are planning a home studio or a commercial recording facility, understanding studio acoustics is the key to producing accurate sound recordings.
Why Studio Acoustics Matter
Even expensive recording equipment cannot deliver professional results in a poorly treated room. Echo, outside noise, sound reflections, and bass buildup can affect recording clarity and mixing accuracy.
A professionally designed studio helps achieve:
- Clear vocal recordings
- Accurate sound monitoring
- Reduced echo and reverberation
- Better bass control
- Improved sound isolation
- Professional-quality mixes
Proper acoustics create a controlled environment where sound can be recorded and monitored accurately.
Step 1: Choose the Right Room
The room itself plays a major role in studio performance.
When selecting a studio room, look for:
- Minimal outside noise
- Rectangular room shape
- Moderate ceiling height
- Limited glass surfaces
- Few reflective materials
- Good ventilation access
Avoid rooms directly facing busy roads or areas with heavy external noise.
Medium-sized rectangular rooms usually provide better acoustic balance than square rooms because they reduce standing wave problems.
Step 2: Understand Soundproofing vs Acoustic Treatment
Many people confuse soundproofing with acoustic treatment, but both serve different purposes.
| System | Purpose |
|---|---|
| Soundproofing | Prevents sound from entering or leaving the room |
| Acoustic Treatment | Improves sound quality inside the room |
A professional studio typically requires both systems for the best results.
Step 3: Soundproof the Studio
Seal All Gaps
Small openings around doors, windows, and vents allow sound leakage.
Use:
- Acoustic sealants
- Door sweeps
- Weather stripping
- Solid-core doors
- Soundproof windows
Proper sealing improves isolation significantly.
Upgrade Wall Construction
Thin walls allow sound transmission between rooms.
Professional studios often use:
- Double drywall layers
- Mass Loaded Vinyl (MLV)
- Acoustic insulation
- Decoupled wall systems
- Resilient channels
These systems help block airborne noise and improve recording privacy.
Install Floating Floors
Floor vibration is a major issue in studios, especially for music production.
Floating floor systems isolate the studio floor from the building structure and reduce:
- Footstep noise
- Low-frequency vibration
- Structural rumble
- Equipment vibration
This is especially important in apartments and commercial buildings.
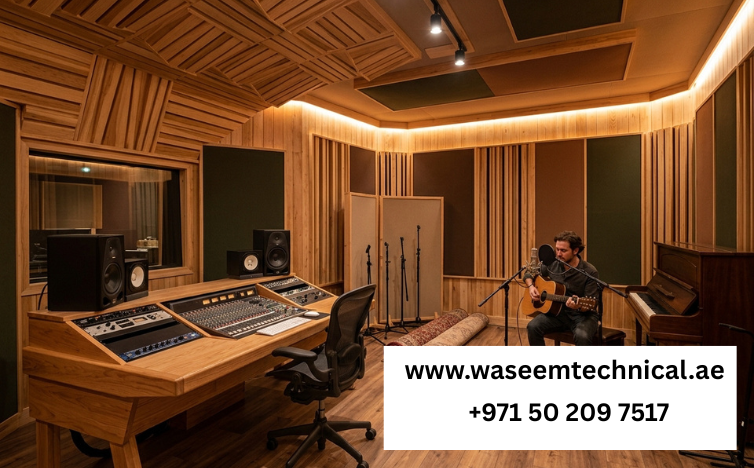
Step 4: Install Acoustic Treatment
Once sound isolation is complete, the next step is improving the room’s internal acoustics.
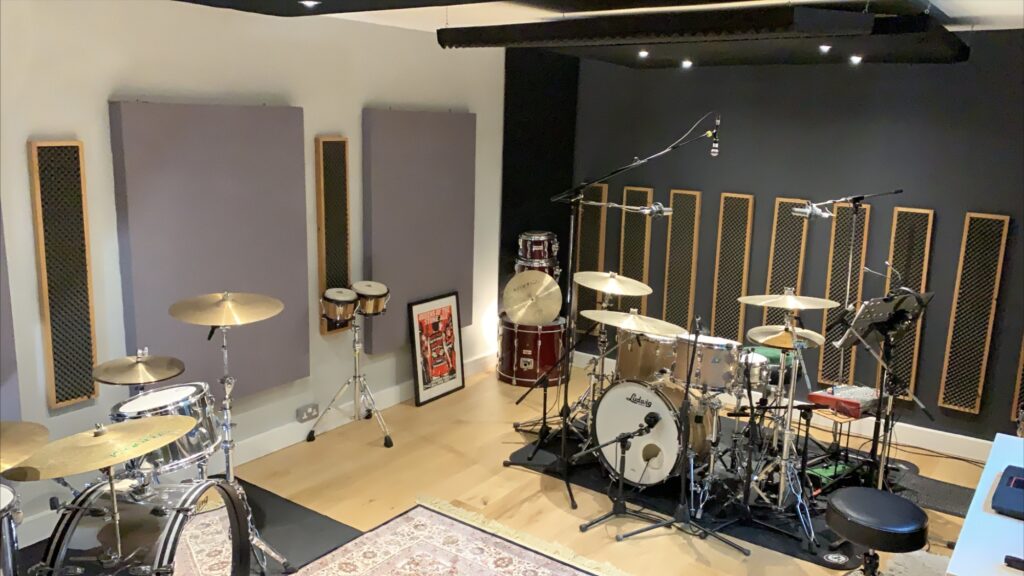
Acoustic Panels
Acoustic wall panels absorb mid- and high-frequency reflections.
They help reduce:
- Echo
- Harsh reflections
- Flutter echo
- Room reverberation
Panels are usually installed on:
- Side walls
- Rear walls
- Ceiling reflection points
Bass Traps
Low frequencies are harder to control than high frequencies.
Bass traps absorb excessive bass buildup and help create balanced low-end response inside the studio.
They are commonly installed in room corners where bass energy accumulates most strongly.
Ceiling Treatment
Ceilings also reflect sound significantly.
Acoustic ceiling panels or clouds help improve:
- Vocal clarity
- Mixing accuracy
- Overall room balance
This is especially useful for rooms with high ceilings.
Diffusers
Diffusers scatter sound waves evenly throughout the room instead of absorbing them completely.
They help maintain natural room ambience while reducing harsh reflections.
Diffusers are commonly installed on rear walls in professional studios.
Step 5: Optimize Studio Layout
Correct equipment placement is essential for accurate monitoring.
Speaker Placement
Studio monitors should:
- Sit at ear level
- Form an equilateral triangle with the listener
- Stay away from walls and corners
Incorrect monitor placement can create inaccurate sound response.
Recording Position
The microphone recording area should avoid strong wall reflections and excessive bass buildup.
Many studios use portable acoustic panels around vocal recording areas for cleaner sound capture.
Step 6: Control HVAC Noise
Air conditioning noise is a common problem in UAE studios due to constant cooling requirements.
HVAC systems can introduce:
- Fan hum
- Airflow noise
- Mechanical vibration
Professional studio setups often include:
- Insulated ducting
- Silent air vents
- Vibration isolators
- Acoustic duct silencers
This helps maintain quiet recording conditions.
Step 7: Choose Essential Studio Equipment
A professional recording studio setup typically includes:
| Equipment | Purpose |
|---|---|
| Microphone | Recording vocals and instruments |
| Audio Interface | Converts audio signals |
| Studio Monitors | Accurate sound playback |
| Headphones | Monitoring recordings |
| DAW Software | Recording and editing audio |
| Acoustic Panels | Sound absorption |
| Bass Traps | Low-frequency control |
Acoustic treatment should always be prioritized alongside recording equipment.
Types of Recording Studios in the UAE
Home Studios
Ideal for:
- Podcasters
- YouTubers
- Voiceover artists
- Solo musicians
Home studios usually require moderate soundproofing and compact acoustic treatment.
Commercial Studios
Commercial recording facilities often require:
- Floating rooms
- Multi-room layouts
- High-level sound isolation
- Professional acoustic calibration
- Advanced ventilation systems
These studios are designed for professional music production and client work.
Common Studio Design Mistakes
Ignoring Room Acoustics
Bare walls and untreated ceilings create excessive reflections that damage recording quality.
Using Foam Alone
Foam panels help reduce reflections but do not fully soundproof a room.
Poor Speaker Placement
Incorrect monitor positioning creates inaccurate mixes and poor stereo imaging.
No Bass Control
Without bass traps, low frequencies become uneven and difficult to mix properly.
Overlooking Ventilation Noise
Air conditioning systems can easily affect recording clarity if not isolated correctly.
Benefits of Professional Studio Design
Professional studio acoustic planning helps achieve:
- Accurate sound reproduction
- Better recording clarity
- Reduced external noise
- Balanced frequency response
- Long-term studio performance
- Improved workflow
Experienced acoustic specialists evaluate room dimensions, sound behavior, reflection points, and isolation requirements to create optimized recording environments.
Call us: Contact Waseem Technical Soundproofing Expert in Dubai: +971 50 209 7517
Final Thoughts
Building a professional recording studio in the UAE requires careful planning, proper soundproofing, and high-quality acoustic treatment. From room selection and floating floors to bass traps and ceiling panels, every detail affects the final recording quality.